


Clever title, huh? It's been a long day, what can I say? A friend's baby shower is Saturday and I wanted to supplement her registry gift with a handmade gift. I bought this cute fabric last summer and have been waiting for an opportunity to use it. I thought it would be fun to make her a fabric covered cork board to display pictures, congratulation cards and little notes in the little guy's nursery.
 For this project you will need:

- A 12 x 16" canvas
- Fabric to cover the canvas
- Ribbon (I used satin but grosgrain works well too)
- Buttons
- Scissors
- Fabric glue

1) Make sure your fabric is straight and then turn it right side down. Place your canvas right side down on the fabric.


2) Place glue along the top and bottom back frames and fold the fabric over along them, making sure to press down and smooth the fabric out to prevent wrinkles/creases.

3) Fold excess fabric between the wood frame and the canvas. In the picture I have folded the bottom seam but not the top one.


4) The fabric for the sides was too long so I cut it down. I then folded the ends in like I was wrapping a gift so I would have clean creases. Repeat step 2 and cut your loose threads.


5) Flip your covered canvas over and then cut your ribbons. I cut two pieces long enough to go diagonally across the canvas and attach at the back (about 18" in length) and four shorter pieces (about 10" in length) then lay out your design.

6) Weave your ribbons over and under each other to build in some added strength. Glue the ends on the back of the canvas.


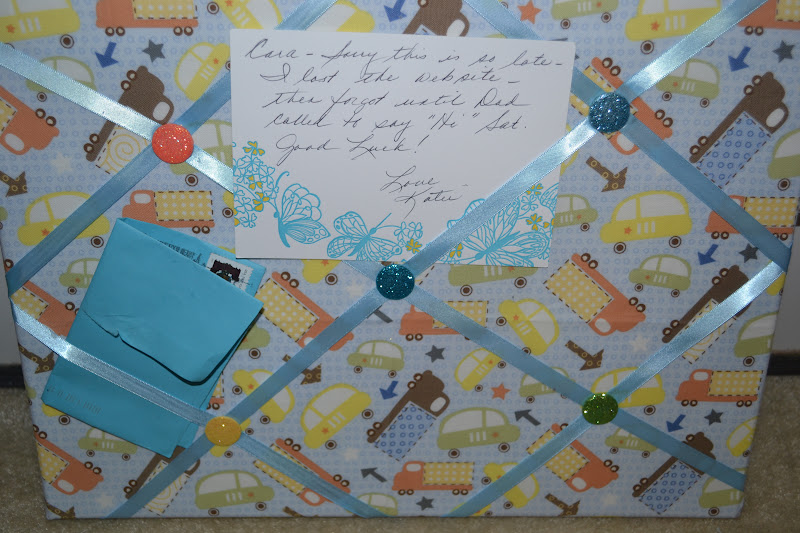
7) Where the ribbons create a "X" add a button. To do this, add a dot of glue between the ribbons to secure them together, and then another dot to secure the ribbons to the canvas. Finally add a dot of glue to the back of your button and secure to the "X" and press down.
Ta da! If you wanted to, you could go a step further and add a wall hanger to the back to mount it. I am really happy with the way this turned out and may have to make one for myself! Its a very cute addition to a boy's nursery in this print, but would be adorable for the kitchen, office or entryway for holding photos, to-dos, grocery lists, etc in another print.
Happy crafting and happy weekend!

- A 12 x 16" canvas
- Fabric to cover the canvas
- Ribbon (I used satin but grosgrain works well too)
- Buttons
- Scissors
- Fabric glue


2) Place glue along the top and bottom back frames and fold the fabric over along them, making sure to press down and smooth the fabric out to prevent wrinkles/creases.

3) Fold excess fabric between the wood frame and the canvas. In the picture I have folded the bottom seam but not the top one.


4) The fabric for the sides was too long so I cut it down. I then folded the ends in like I was wrapping a gift so I would have clean creases. Repeat step 2 and cut your loose threads.


5) Flip your covered canvas over and then cut your ribbons. I cut two pieces long enough to go diagonally across the canvas and attach at the back (about 18" in length) and four shorter pieces (about 10" in length) then lay out your design.

6) Weave your ribbons over and under each other to build in some added strength. Glue the ends on the back of the canvas.


7) Where the ribbons create a "X" add a button. To do this, add a dot of glue between the ribbons to secure them together, and then another dot to secure the ribbons to the canvas. Finally add a dot of glue to the back of your button and secure to the "X" and press down.
 |
| Wait for your glue to dry and make sure you use clear glue! |
Happy crafting and happy weekend!


8 comments:
Cara, what a cute present to give your friend! I made one similar to this a few weeks back, but I used a corkboard instead of canvas:)
♥ laura
the blog of worldly delights
You have the best DIYs. This is such a fun gift idea, and I love it that it can be customized for the type of person/event.
This is SO cute! Also - see you on Saturday! :)
This is a really great DIY, easy to make and the results are fabulous. thank you for sharing this and thanks for dropping by my blog too. You have got a really cute blog. Following you!
mongs
mythriftycloset.blogspot.com
Cara, that is so cute! I know she i going to love it. I love the print and it's such a useful gift. Enjoy your weekend.
http://www.averysweetblog.com/
great idea!
i made one of these for my office area and i love it
couldn't live w/o it now
brett
This is such a great idea!
I love how it turned out, so pretty!
Post a Comment
I love hearing from you, sweet readers! Your comments and suggestions make my day!