


I'm always late to trendy craft projects, but its my blog and I'll dye if I want to. I'm sure you've seen ombre dyed clothing all over the place but if you haven't let me introduce you to an easy way to spice up your summer wardrobe. I knew I had to give ombre dyeing a try after seeing this blazer first on ASOS and then worn fabulously on Chain Strap Purse. Before comitting a pricey blazer to a dye bath I wanted to start with something inexpensive, enter the plain white tee!
To DIY DYE you will need:
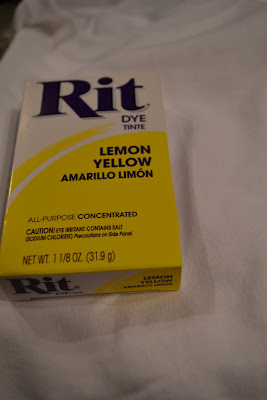
- Fabric Dye in the color of your choice (I used Rit powder dye in lemon but if you can get liquid dye I would go with that)
- A pre-washed and pre-shrunk item to dye
- 5 gallon Bucket if you aren't using your kitchen sink
- Fabric pins
- Salt
- Trash bags (optional)
1) I wanted two colors, pale yellow nearest the bust and dark lemon along the waistline. Fold your shirt in half lengthwise and pin your shirt on both sides of the fold near the bust marking the top of your pale yellow dye. Several inches lower (3" for me) pin both sides again, this will be the start of your darkest band. You can absolutely freehand this as well.

2) Follow the instructions on the dye package to get the right mixture of dye/water/salt. I used almost one full package of powder dye to 2 cups of hot water and 1 tsp of salt. (Note: I should have used more salt to achieve bolder colors.)
3) Fill a bucket or sink with stopper with 3-4" of hot water.
4) If you don't have a place to dry your item of clothing post-dye job you can use two trash bags spread on your stove/cabinet/floor.

5) Once you are ready, add your dye/water combo from step 2 to your sink/bucket of hot water. Stir to mix completely.
6) Immerse your item of clothing to your top line of pins for 30 seconds. Swish back and forth through the dye to make sure you have an even line across your shirt. Once you are happy with the light color, pull the top section up and out of the dye. Leave the bottom section in the dye. I cut the bottom in half and left half in for an additional 30-60 seconds swishing back and forth. The bottom section was in the dye for 2-2.5 minutes total.

7) When you are happy with your dye job, place your item on trash bags to dry completely (overnight preferably). Seal in colors by putting in a hot dryer for 15-20 minutes.

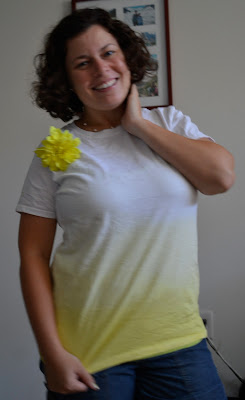
Sport your new ombre piece to any of your favorite summer activities! I'm happy with my first attempt but there is still much room for improvement..and I want to do it again with purple and some shorts. Weekend activity perhaps?
 |
| Inspiration via Chain Strap Purse |
- Fabric Dye in the color of your choice (I used Rit powder dye in lemon but if you can get liquid dye I would go with that)
- A pre-washed and pre-shrunk item to dye
- 5 gallon Bucket if you aren't using your kitchen sink
- Fabric pins
- Salt
- Trash bags (optional)


2) Follow the instructions on the dye package to get the right mixture of dye/water/salt. I used almost one full package of powder dye to 2 cups of hot water and 1 tsp of salt. (Note: I should have used more salt to achieve bolder colors.)
3) Fill a bucket or sink with stopper with 3-4" of hot water.
 |
| Double up your bags for extra protection of the drying area. |

5) Once you are ready, add your dye/water combo from step 2 to your sink/bucket of hot water. Stir to mix completely.
6) Immerse your item of clothing to your top line of pins for 30 seconds. Swish back and forth through the dye to make sure you have an even line across your shirt. Once you are happy with the light color, pull the top section up and out of the dye. Leave the bottom section in the dye. I cut the bottom in half and left half in for an additional 30-60 seconds swishing back and forth. The bottom section was in the dye for 2-2.5 minutes total.

7) When you are happy with your dye job, place your item on trash bags to dry completely (overnight preferably). Seal in colors by putting in a hot dryer for 15-20 minutes.


Sport your new ombre piece to any of your favorite summer activities! I'm happy with my first attempt but there is still much room for improvement..and I want to do it again with purple and some shorts. Weekend activity perhaps?


10 comments:
Very cute and it doesn't seem hard at all, thanks for the idea (I guess I'm really behind on the DIY circuit).
What a great DIY! I absolutely love the end product.
$100 Shopbop GIVEAWAY
What a cute idea! I've done tye-dye shirts before but never the ombre look like this. Very chic!
http://www.jonestshirts.com
This is such a great idea! I would love to diy an ombre maxi!
I love science as well so a trip the the Galapagos Island was beyond amazing! I would definitely recommend a trip there :)
xoxoxo
Wow, this is a terrific idea, you are so creative! I am thinking it could be great for a white maxi dress as well. The yellow looks so bright and lovely!
Great DIY!
www.northernstyle.blog.com
That's super cute Cara!!! I love it! I love the ombre look and that yellow is awesome on you. Girl, I forgot to add ET to my list too! LOL
http://www.averysweetblog.com/
oh my gosh, YES! I was thinking about doing this but I didn't know what item of clothing I would sacrifice. I'd love yo see you do a jacket!
♥ laura
the blog of worldly delights
the shop of worldly delights
We somehow missed this post! Cute shirt! You did a great job!!
Jayme & Mendi @ Her Late Night Cravings
Nice DIY, I love the result ;)
Post a Comment
I love hearing from you, sweet readers! Your comments and suggestions make my day!