Showing posts with label DIY. Show all posts

8.28.2012

Ban.do Barrettes = Can.do DIY

Weeks ago my pal Marisol spotted these adorable Ban.do* barrettes on Anthropologie's website.  We fell in love with the subtle sparkles and figured they would be a fun alternative to our daily black bobby pins.
The inspiration aka the barrettes that got away.
As luck would have it, the barrettes sold out long before we remembered to buy them.  Then while on one of those Target trips where you go in for toilet paper, vitamins and Ziploc bags and leave with $100 worth of stuff I spotted some hair clips that made the missed barrettes seem DIYable.


For this project you will need: 
- Barrettes (I used Goody Bobby Slides)
- Craft glue
- Glitter
- Scraps of paper
- Toothpicks
Note: Do not need to use the acrylic sealer pictured above, it screws up the drying process.


1) Squeeze some glue on a scrap of paper.


2) Remove the barrettes from the packaging and place them on a piece of scrap paper. This keeps you from getting glue between the barrette's top and bottom pieces making it difficult to open.
Note: I did not use enough glue on this one. 
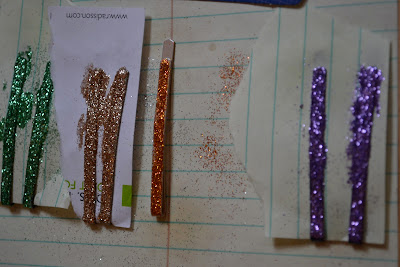
3) Apply a liberal amount of glue on the top of the barrette, you can use your finger or a toothpick.


3) Sprinkle glitter on top of the glue and allow to sent for a minute.  Tap excess glitter on a clean surface and re-apply glue and glitter as needed.


4) All to dry for several hours or overnight.


5) Add to your favorite outfit and sparkle and shine!

I'm really happy with how these turned out, particularly the green, purple, silver and gold pairs. I made the gold set with Marisol in mind so I gifted her that pair.  They were an easy and affordable alternative to the Ban.do clips.  Wouldn't this be a fun project for a little girl's birthday party or as a party favor or stocking stuff? The holidays are coming!

*I just realized that there are other glitter barrettes on Ban.do's website if crafting is not your strong suit but you need some glitter in your life hair.

6.26.2012

DIY DYE Job: Ombre t-shirt

I'm always late to trendy craft projects, but its my blog and I'll dye if I want to.  I'm sure you've seen ombre dyed clothing all over the place but if you haven't let me introduce you to an easy way to spice up your summer wardrobe.  I knew I had to give ombre dyeing a try after seeing this blazer first on ASOS and then worn fabulously on Chain Strap Purse.  Before comitting a pricey blazer to a dye bath I wanted to start with something inexpensive, enter the plain white tee!
Inspiration via Chain Strap Purse
To DIY DYE you will need: 
- Fabric Dye in the color of your choice (I used Rit powder dye in lemon but if you can get liquid dye I would go with that)
- A pre-washed and pre-shrunk item to dye
- 5 gallon Bucket if you aren't using your kitchen sink
- Fabric pins
- Salt
- Trash bags (optional)


1) I wanted two colors, pale yellow nearest the bust and dark lemon along the waistline. Fold your shirt in half lengthwise and pin your shirt on both sides of the fold near the bust marking the top of your pale yellow dye.  Several inches lower (3" for me) pin both sides again, this will be the start of your darkest band. You can absolutely freehand this as well.


2) Follow the instructions on the dye package to get the right mixture of dye/water/salt.  I used almost one full package of powder dye to 2 cups of hot water and 1 tsp of salt.  (Note: I should have used more salt to achieve bolder colors.)

3) Fill a bucket or sink with stopper with 3-4" of hot water.
Double up your bags for extra protection of the drying area.
4) If you don't have a place to dry your item of clothing post-dye job you can use two trash bags spread on your stove/cabinet/floor.

5) Once you are ready, add your dye/water combo from step 2 to your sink/bucket of hot water.  Stir to mix completely.

6) Immerse your item of clothing to your top line of pins for 30 seconds. Swish back and forth through the dye to make sure you have an even line across your shirt.  Once you are happy with the light color, pull the top section up and out of the dye. Leave the bottom section in the dye.  I cut the bottom in half and left half in for an additional 30-60 seconds swishing back and forth. The bottom section was in the dye for 2-2.5 minutes total.

7) When you are happy with your dye job, place your item on trash bags to dry completely (overnight preferably).  Seal in colors by putting in a hot dryer for 15-20 minutes.


Sport your new ombre piece to any of your favorite summer activities! I'm happy with my first attempt but there is still much room for improvement..and I want to do it again with purple and some shorts.  Weekend activity perhaps?


6.03.2012

DIY Kate Spade Necklace

Oops, it has been a long time since I shared a craft project with y'all.  Fortunately, I did some crafting this weekend so more projects are forthcoming!

Image via Polyvore
I spotted this Kate Spade Rosewood Dot necklace on the Kate Spade website a long time ago and thought it was a perfect, easy way to add a splash of neon into my spring/summer wardrobe...but not for $128.00. So, in true i Dabble fashion I attempted to make my own with my own personal touch. It was super easy, affordable ($7.00!!) and fun to recreate.


I used:
- 14 3/4" Wooden beads (find them in the wood craft department at A.C. Moore/Michaels)
- Hot Pink acrylic paint and paintbrushes
- Clear Acrylic sealer
- Embroidery floss/needle/extra bead or chain to finish your necklace


1)  Spread newspaper on a clean work surface and paint 8 (or as many as you want) wood bead halves with hot pink paint. Set aside to dry.  I painted 5 beads completely hot pink in lieu of two shades of wood as shown above. A second or third coat may be necessary to ensure full coverage on all beads.

Make sure your sealer works on wood
2) Once all beads are dry, in a well-ventilated area, spray clear acrylic sealer 10-12" away from the beads to seal the color and add some shine to the beads.  Make sure the beads are not touching each other before spraying because the color may bleed.  Set aside to dry.  I applied three coats total.


3) Cut a piece of embroidery floss 24" long and double over. Thread the two cut ends of the floss through a needle and then thread the beads onto the floss.  I used the pattern of solid, half, half, solid, etc.

Knot at the top, and then again at the bottom
4) Add a knot on each side of the necklace to secure beads and add jewelry clasps to the ends of the floss if you have them. I lent my bag o'fasteners to a friend so I needed to improvise.  I threaded my cut ends of floss through an extra bead, knot the floss at the top of the bead and then wrapped the floss back around to the bottom of the bead and knotted it again.  That's confusing, the picture is easier to understand.

5) Place the necklace on a clean surface and add another layer (or two) of acrylic sealer if you want more shine like I did.

Before heading to Blogger Blitz!
Let the necklace dry for several hours, if not overnight.  Then go forth and rock it! I'm really happy with how mine turned out, it's not an exact replica of Ms. Spade's but I love the added color in mine.

I hope you had a great weekend; mine was wonderful, productive and fun.  I ended my Sunday with Blogger Blitz DC! Such fun meeting so many beautiful, talented bloggers! 

4.08.2012

DIY Headboard: An inexpensive upgrade

Interior design is not my strong suit; our apartment is very IKEA-centric, very white and there is a golf ball collection on our living room wall.  As we grow older our post-college furnishings grow less and less pleasing to our maturing tastes. We have wanted a "grown up bed" i.e. an actual frame for awhile but a) they are expensive and b) our bedroom is too small to allow us to have both a headboard and foot board, so I decided to make us a headboard.  It was surprisingly fast, easy and inexpensive.


For this project you will need:
- 1/2" thick plywood to fit your bed (We have a Queen and used a 48x60" board)
- 5 yards of fabric (I used a herringbone faux suede upholstery remnant)
- Full Size foam mattress pad
- Gorilla Glue/Krazy Glue
- Staple Gun
- Drop Cloth (optional)
- Spray Bottle of water or a dampened rag
- Hammer (optional)
- Another set of hands (I enlisted the help of my friend Royela, aka the one who actually figured out the step-by-step process for this project several weeks prior)


1) Lay your drop cloth down in your work area, prop your plywood against a hard surface and your foam mattress pad knobby side up.


2) Place your plywood on the mattress pad leaving several inches on every side. Roll the mattress pad over one of the wide edges of the plywood (this will be the bottom or top of your headboard), pull it taut and staple the pad into place.  Hammer the staples down into the wood to make sure they are secure. If you have two sets of hands, have one person hold the pad taut and one person wield the staple gun, putting staples every 2" apart.

Royela being liberal with the glue
3) Once the edge is stapled, lift the plywood up and lean it against a hard surface.  One person should thoroughly cover the plywood with glue while the other one dampens the knobby side of the mattress pad with water with a spray bottle or wet rag. You do not need to use much water, just enough to make the pad stick to the glue.  Drop the plywood glue side down onto the mattress pad.


4) Staple the other wide side, i.e. the one opposite of the one completed in step 2 and then the two long sides, add a second set of staples on the last side if needed.  Hammer all of your staples in. Pick up the board and smooth out any bumps in the pad that may have occurred between the stapling and glueing.
You want a smooth surface to staple your fabric to.


.

5) Remove your dropcloth and lay your fabric, right side down on the floor.  Wrap the fabric over the board/pad, pull tightly and staple into place on all four sides like you did with the mattress pad. Check the front between stapling sides to make sure there are no wrinkles in the fabric.

6) You can add a 50lb wall hanger/bracket onto the back of the plywood/wall to mount your headboard onto your bedroom wall, or you can rest the headboard on the ends of your bed frame like we did.  (We didn't see the need fto put another large hole in an apartment wall we are moving out of this year.)


I never know how to end these DIY posts but Ta-Da!  The headboard took about an hour to make and about $45 in supplies + fabric.  I had a crazy fabric store coupon so my herringbone fabric was basically free.  I love how it turned out, I really think it adds a small touch of sophistication to our bedroom.

Have you made a headboard before or made any interior design changes recently?  I would love to know what home improvements you've made to your own spaces. I hope you had a Happy Passover and Easter, I can't wait to feature more shoes this week, and maybe a new recipe!


4.01.2012

Play with Clay: Anthropologie-inspired necklace project

Every season Anthropologie presents some of the most beautiful and unique items, window displays and catalogues around.  As lovely as their items are, they are increasingly out of my price range.  I spotted this necklace a few weeks ago but couldn't fathom paying $68 for a fabric necklace so I filed it away for another (richer) day. HOWEVER when Jen showed off her gorgeous Sculpey creation, I was inspired to try my hand at clay and do a little AnthropoloDIYing myself.
Piece de inspiration
For this project you will need:

- Sculpey clay in three colors of your liking
- A thick needle
- Glass filler beads
- Jewelry wire/cord
- A lobster clasp and tag
- Cardboard (optional)
- Embroidery Floss (optional)
- Hot Glue Gun (optional)


1) On a clean surface and with clean hands open your clay and knead it until its soft and easy to work with.  Start rolling beads until you have enough to work with.  For this necklace I made 42 red beads, 40 purple beads and 38 pale pink beads.


2) Using a thick needle poke a hole in each bead.  Place each finished bead in a baking dish.

3) Bake the beads for 15 minutes or until firm (more time for bigger/thicker beads) at 275 degrees.  Cool in the dish for at least 30 minutes.

4) Thread beads on the wire using the same color with one glass filler bead between two colored beads.   I placed two filler beads in the middle of my necklace (see next picture) and threaded each side from there, placing 21 red/20 purple/19 pink beads on each side from the middle. You can finish your necklace here with your closure if you like.


5) If you want to make the fabric pieces, cut out two squares and four squared off triangles from your cardboard (I used a spaghetti box.)  Place one square between the two filler beads and hot glue the square in place making sure to secure all three wires.  Then add more glue and secure the other square on top of the already glued square. Repeat this step at the ends of the strands of beads with the squared off triangles.
Note: This picture was taken during trial and error of the fabric square but it shows the wrapping process.
6) Put a line of hot glue on one end of the square and place the embroidery floss along the glue and then wrap tightly around the square until you reach the end of the square and glue the end of the string down. Make sure to cover the entire square.  Repeat with the squared off triangles.

7) Add the lobster clasp to one end of the necklace and the tag to the other and go out and rock your new accessory.


So what do you think? I am really happy with my end product and I'm even more pleased that it cost me less than $5 to make.  It was more time intensive than planned but nothing a few hours of bad TV couldn't fix.  Now that I know the process, I cannot wait to play with clay some more this coming weekend! I want to know, dear readers have you experimented with Sculpey before?  I hope you had great weekends and are looking forward to the first week of April, wee!

3.08.2012

Fabric Covered Cork Board: A new DIY

Clever title, huh? It's been a long day, what can I say? A friend's baby shower is Saturday and I wanted to supplement her registry gift with a handmade gift. I bought this cute fabric last summer and have been waiting for an opportunity to use it. I thought it would be fun to make her a fabric covered cork board to display pictures, congratulation cards and little notes in the little guy's nursery.
For this project you will need:

- A 12 x 16" canvas
- Fabric to cover the canvas
- Ribbon (I used satin but grosgrain works well too)
- Buttons
- Scissors
- Fabric glue

1) Make sure your fabric is straight and then turn it right side down.  Place your canvas right side down on the fabric.


2) Place glue along the top and bottom back frames and fold the fabric over along them, making sure to  press down and smooth the fabric out to prevent wrinkles/creases.


3) Fold excess fabric between the wood frame and the canvas.  In the picture I have folded the bottom seam but not the top one.


4) The fabric for the sides was too long so I cut it down.  I then folded the ends in like I was wrapping a gift so I would have clean creases. Repeat step 2 and cut your loose threads.


5) Flip your covered canvas over and then cut your ribbons.  I cut two pieces long enough to go diagonally across the canvas and attach at the back (about 18" in length) and four shorter pieces (about 10" in length) then lay out your design.

6) Weave your ribbons over and under each other to build in some added strength.  Glue the ends on the back of the canvas.


7) Where the ribbons create a "X" add a button. To do this, add a dot of glue between the ribbons to secure them together, and then another dot to secure the ribbons to the canvas.  Finally add a dot of glue to the back of your button and secure to the "X" and press down.

Wait for your glue to dry and make sure you use clear glue! 
Ta da! If you wanted to, you could go a step further and add a wall hanger to the back to mount it.  I am really happy with the way this turned out and may have to make one for myself!  Its a very cute addition to a boy's nursery in this print, but would be adorable for the kitchen, office or entryway for holding photos, to-dos, grocery lists, etc in another print.

Happy crafting and happy weekend!